
A Guide to Advanced Laptop Diagnostics: BIOS & Error Codes
- Santanu Chaudhury
- Sep 5, 2025
- 5 min read

When it comes to repairing laptops, diagnostic precision is key. Modern laptops are designed to provide technicians with detailed insights into their performance and issues through tools like the BIOS and error codes. Understanding these diagnostic systems allows you to pinpoint problems faster, saving time and building trust with your customers.
As an experienced trainer in laptop repair, I can confidently say that mastering advanced diagnostic techniques—specifically BIOS configurations and error code analysis—is a must for any professional technician. In this guide, I’ll walk you through the essentials of BIOS and error codes, their importance in diagnostics, and how to use them effectively in 2025’s competitive repair industry.
What is BIOS and Why is it Crucial for Diagnostics?
The BIOS (Basic Input/Output System) is the software embedded on a laptop's motherboard that initializes hardware during startup and provides low-level control over system components. While modern systems often replace traditional BIOS with UEFI (Unified Extensible Firmware Interface), the principles remain the same.
BIOS is a powerful diagnostic tool because it operates independently of the operating system. Even if a laptop's OS is corrupted, the BIOS can provide valuable insights into hardware issues.
Key Functions of BIOS in Diagnostics:

System Initialization: Checks and initializes hardware components like RAM, CPU, storage drives, and peripherals.
Error Reporting: Generates error codes or audible beep codes when hardware malfunctions.
Settings Control: Allows adjustment of hardware configurations, such as boot order, CPU frequency, and power management.
Hardware Tests: Many BIOS interfaces include built-in diagnostic tools to test RAM, hard drives, and other components.
Common BIOS Issues to Watch For

A malfunctioning BIOS can lead to a variety of system problems, including:
Failure to boot (black screen or stuck at the logo).
Error messages like "No bootable device found" or "CMOS checksum error."
Hardware miscommunication, such as RAM or storage drives not being detected.
Incorrect settings that cause instability, like overclocking or incompatible configurations.
Advanced BIOS Diagnostics: Step-by-Step
1. Accessing the BIOS
To access the BIOS, restart the laptop and press the designated key during startup (commonly F2, F10, DEL, or ESC). The key varies by manufacturer, so always check the user manual or online resources.
2. Check the Boot Sequence
If the laptop fails to boot, ensure the boot order is correctly configured to prioritize the internal hard drive or SSD.
3. Run Built-In Diagnostics
Many BIOS interfaces include diagnostic tools for hardware testing. For example:
RAM Test: Checks for memory errors.
Hard Drive Test: Scans for bad sectors or drive failures.
4. Analyze System Logs
Some BIOS/UEFI setups provide logs of recent errors or startup issues. Reviewing these logs can give you clues about recurring problems.
5. Reset BIOS Settings (CMOS Reset)
If the BIOS settings are corrupted or misconfigured, resetting them to default can resolve many issues. This can be done through the BIOS interface or by removing and reinserting the CMOS battery on the motherboard.
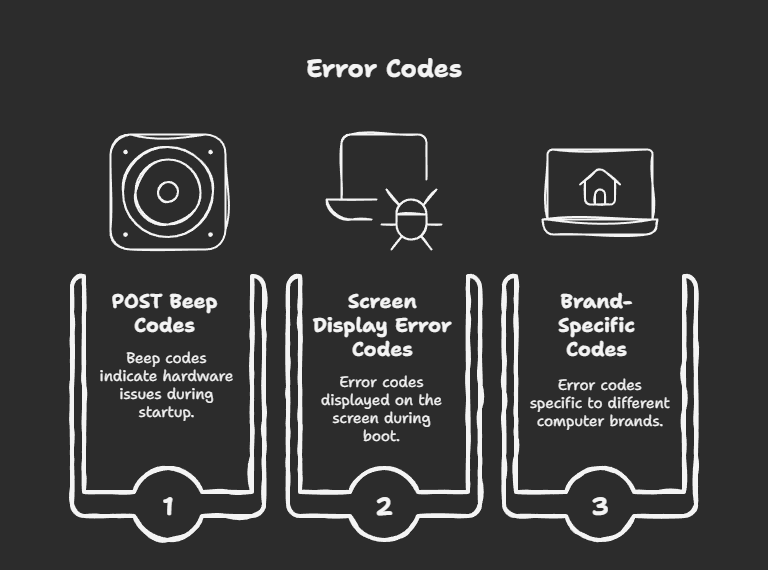
Understanding Laptop Error Codes
Error codes are one of the most reliable ways to diagnose hardware issues. They appear during startup, either as alphanumeric codes on the screen or as beep patterns from the motherboard speaker.
Types of Error Codes:
POST Error Codes: The Power-On Self-Test (POST) runs during startup and reports hardware problems via codes or beeps.
BIOS Error Messages: Displayed on the screen, these messages indicate issues like missing drives or overheating.
Manufacturer-Specific Codes: Many brands, like Dell, HP, or Lenovo, use proprietary error codes that require specific lookup guides.
Common Error Codes and Their Meanings
Here’s a quick reference for interpreting some common error codes:
1. POST Beep Codes
POST beep codes vary by manufacturer, but here are a few examples:
1 Beep: System is functioning normally (common for Dell).
2 Beeps: RAM is not detected or is faulty.
3 Beeps: Motherboard or chipset failure.
Continuous Beeping: Overheating or power supply issue.
2. Screen Display Error Codes
Error 0x00000000: Generic hardware failure.
Error 0x000000F: No bootable device detected—check the hard drive or boot order.
Error 0xC0000225: Missing or corrupted boot files—likely a software issue.
3. Laptop Brand-Specific Codes
Dell:
Error 2000-0142: Hard drive failure.
Error 2000-0122: Faulty RAM module.
HP:
Error 301: Hard drive issue detected.
Error 601: Battery health issue.
Lenovo:
Error 2100: Detection error on HDD or SSD.
Error 1802: Unauthorized wireless card detected.
Advanced Diagnostic Techniques

1. Using Diagnostic Software
If BIOS and error codes don’t provide enough information, use professional diagnostic tools like:
Hiren’s BootCD: A bootable toolkit for hardware diagnostics and recovery.
MemTest86: Tests RAM for errors.
CrystalDiskInfo: Monitors hard drive health.
2. Flashing or Updating the BIOS
If the BIOS itself is malfunctioning, updating it to the latest version can often resolve issues. However, proceed with caution—incorrectly flashing the BIOS can permanently damage the motherboard.
Steps to Update the BIOS:
Download the latest BIOS firmware from the laptop manufacturer’s website.
Follow the manufacturer’s instructions carefully (usually involves creating a bootable USB).
Ensure the laptop is plugged into a power source before updating.
3. Testing Components Individually
Sometimes, diagnosing hardware issues requires isolating components. For example:
Test RAM by removing one module at a time and booting the system.
Use a known working hard drive to rule out storage-related errors.
Test the power supply and battery with a multimeter to ensure proper voltage.
Why Mastering Diagnostics is Essential
In the competitive repair industry, diagnostic expertise is what separates professionals from amateurs. Customers expect quick, accurate solutions to their laptop problems, and being able to identify issues through BIOS and error codes demonstrates your technical proficiency.
By mastering advanced diagnostics, you’ll not only save time but also build trust with your clients—leading to repeat business and referrals.
How Our Training Program Prepares You for Advanced Diagnostics
In our professional laptop repair training program, we dedicate an entire module to advanced diagnostics, including BIOS configuration and error code analysis. Here’s what you’ll learn:
How to interpret and respond to POST error codes and beep patterns.
Advanced BIOS troubleshooting techniques, including resets and firmware updates.
Using professional diagnostic software to supplement BIOS tools.
Hands-on practice diagnosing real-world hardware failures.
We also provide detailed guides for brand-specific error codes (Dell, HP, Lenovo, etc.), ensuring you’re prepared for any laptop that comes your way.
Final Thoughts
Mastering advanced diagnostics such as BIOS and error code analysis is a game-changer for any laptop repair professional. These skills allow you to identify issues with precision, build customer confidence, and establish yourself as a trusted expert in the field.
If you want to elevate your repair skills and tackle even the most complex laptop issues, join our training program today. With hands-on guidance and expert instruction, we’ll help you become a diagnostic powerhouse in the laptop repair industry.
Ready to begin? Contact us now to enroll and take your diagnostics skills to the next level!


Comments